Showing posts with label foodie. Show all posts

Friday, May 31, 2013

Say Hello to Jessica, Our Last Guest Blogger!

I am so excited to introduce to you our last guest blogger of the month, Jessica, from Jessica Silvius Photography. Jessica and I have bonded over the years through our shared love of food and photography. She, being an amazing photographer and I being a fan of her amazing pictures. I am going to admit to you all now (not that you hadn't noticed already) that most of the photos on HNE are from my...cell phone...GASP! I know! I know! It's quite the injustice to the recipes I share with you, because I don't think it gives you a great idea of what the food should look like in the end. I am confident in the things I do well and I know where I tend to struggle, so I feel no shame in admitting that I've often wished that I could provide my readers with better photos of the recipes I leave here for you. That being said, I am pleased to announce that Jessica will not only be joining us today, as a guest blogger, but she is also joining the Her Name is Ed team indefinitely as our new food stylist and photographer! You are all in for a real treat because Jessica is amazing at what she does. I am so excited to see how this new chapter at HNE will go! I am such a big fan of Jessica's work (I actually just had my very own photo shoot with her last week!) and I know she is going to be such a wonderful addition to the team! So without further ado, please join me in welcoming Jessica to HNE! 


When Eva asked me to guest blog I was super excited, and then panic struck... how do I attempt to explain this humungous topic while still managing to make sense and not write a novel?! So, I decided to approach the basics. Let me give you tools and food for thought to think of when approaching your own food photography - little tips and tricks that help to create effective images. 

A quick blurb on gear: The camera is not going to create the image - you are. That said, don’t go and blow all of your hard earned cash on the latest and greatest professional grade DSLR just for a few food pictures. Learn whatever camera you’ve got. iPhone? That’s fine! I will address the iPhone camera and its uses in 
  • Food photography needs to look appetizing! Food is the product and your image needs to sell it. The goal is to evoke the viewer to action - whether it be going to your restaurant, making your recipe, ordering your edible treats, or simply “pinning” them for future reference - you want your viewer to crave what you are sharing with 
  • Let’s keep it simple. Collections of multiple subjects are hard for anyone to compose well, so it’s best to keep your images clean and simple. Focus on your intended 
  • Lighting. Lighting is your best friend and your worst enemy. Beautiful lighting will make a beautiful image, where bad lighting with harsh shadows or blown-out highlights can ruin an image. Lighting is found both naturally and created 
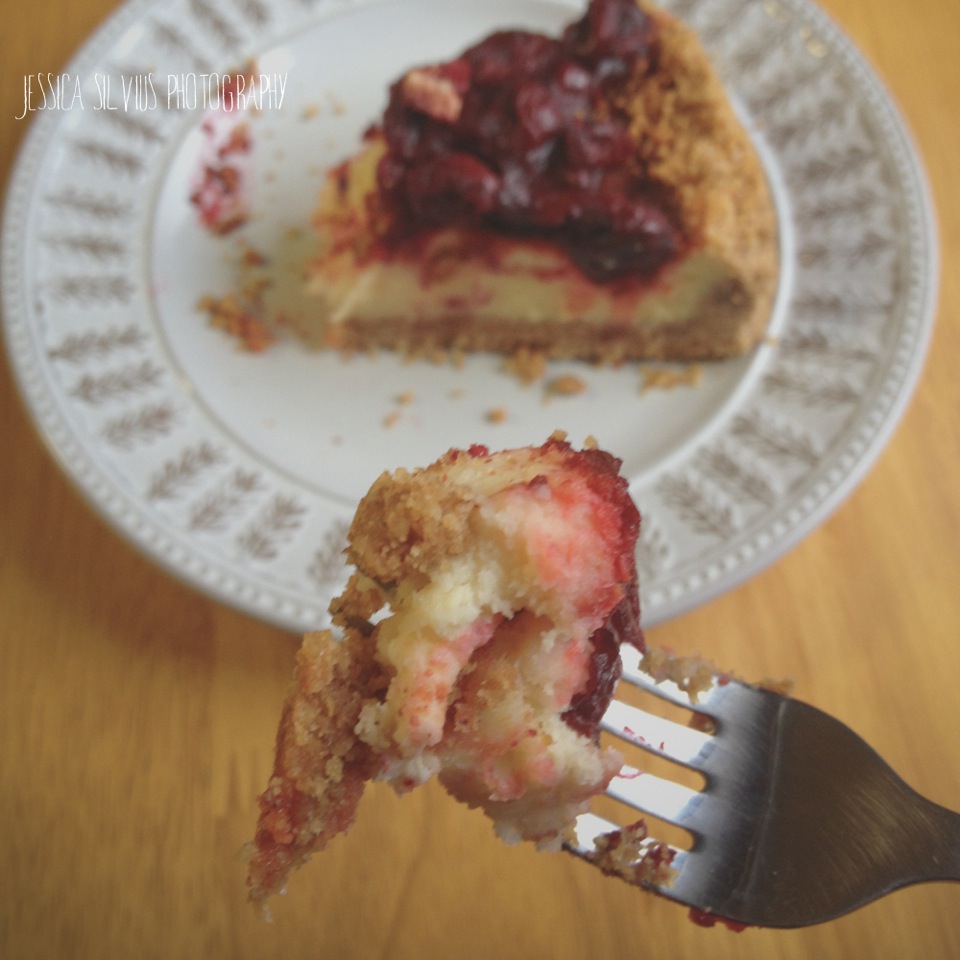
First Let’s set up. Keeping it simple, I have my kitchen table next to the window letting in the sun. My plate is white with a simple detail around the edge. I am featuring cherry cheesecake with an awesome, thick graham cracker crust. I shot from the kitchen chair pictured. Half the time I was standing on it. Always feel free to move around your subject, it creates more interesting images.


For this first shot [ standing on the chair ] I composed my image looking straight down at the cheesecake. Perfectly centered images are generally uninteresting, so photographers rely on the Rule of Thirds. This “rule” requires you to imagine a tic-tac-toe grid in your frame of view and then you place your subject’s focus on one of the points.


Now to add some more creative techniques. Shooting with shallow depth of field essentially focuses on the image closest to you and then blurs out the background. A lower f-stop designates this technique on your camera. If you are able to set your f-stop, set it down to 5.6 or lower. If you your camera doesn’t have adjustable settings, no problem. At the end I’ll show you how to achieve a shallow depth of field with your iPhone. 


This image combined shooting at a shallow depth of field and adding artificial lighting to my natural window light. I flipped on my overhead kitchen light and placed an external flash unit in my kitchen to the left. [ No flash unit? Try a lamp or a flashlight ] This filled the image with more light and allows us to see the bite of cheesecake perfectly. Also, creatively by adding the fork and displaying a bite, we are still able to see our subject, but in the way it is intended to be used. We are showing the viewer how wonderful it is to eat. =)

Now let’s get a little more creative. Don’t forget that photography is truly an art form, use it to express the mood and feel you want your subject to evoke. In this case I was thinking about late morning breakfast, you know the time when you figure dessert is perfectly acceptable for breakfast because it has fruit in it? 


To create that feel and mood I placed my flash unit behind the cheesecake and stayed next to the window with the overhead light on. The flash created a fill light reminiscent of the bright sunlight coming through windows in the morning. Every image has a story, use creative techniques to create yours.

Finally some iPhone pictures. Instagram has revolutionized the “food pic”. I encourage you to not have just “another” Instagram food shot though! Yes, I use filters, I crop and I edit, but if you compose a well thought out image right off the bat, your food pictures will have much more impact. 

For this first iPhone photo, I tried using just the window light, but it was a bit dark for the iPhone, so I just flipped back on the kitchen light. Composed off center, overhead perception, no edits needed.


For this second iPhone photo I wanted to show you the great depth of field capability iPhone has. The last photo had a wide depth of field - everything was in focus. That is how most iPhone photos start out. So for this one I simply grabbed a bite and touched the iPhone screen where I wanted the focus, on the bite on the fork. This blurred out the rest of the image and puts the viewers focus on the tasty bite. I cropped this to fit the Instagram square, but you can avoid cropping images to squares by using apps like Squaready and Afterlight. 


I hope this has proven to be helpful, and if you have any questions don’t hesitate to post in the comments below!

About me: I met Eva a few years ago though my significant other, Evan. They had been friends for years and years. Eva and her husband Mike, have proven to be amazing friends to Evan and I. We’ve had lots of fun together over the years including some pretty memorable dinner parties. I have a minor in photography from Northern Arizona University and a BSBA in marketing. I love it. I love to combine my business side with my creative side and sprinkle my love of food, wine, people and the outdoors in between. I moved back to the Central Coast of California this week from Arizona! I am so excited to be back and enjoy summer in SLO county. ☼♡

You can visit my website here: www.jessicasilvius.com which includes links to my blogPinterest boards, Instagram and Facebookpage. In addition to food photography, I have fallen head over hills for portrait photography. If you would like to schedule a shoot, do not hesitate to shoot me a message! 
xo, Jessica

Wednesday, April 24, 2013

Eaten Anywhere Good Lately?

Yes! I have. I have been busy busy busy eating EVERYTHING and taking massive amounts of notes so that I can share with you some of my "Off the menu" recipes. Restaurant quality meals that you can whip up at home on the cheap and they are so easy! Be patient, geez. You can't rush genius like this...er...yeah.

I know I have been seriously slacking on the recipe front lately and I promise to make it up to you. I have some real treats planned for you in the coming months.  The entire month of May will be guest blogger month here at H.N.E. And in June I will be unveiling a new exciting project I've been working on! Well a few new projects, and I am so excited to share them with you. I just need some time to get everything in order and that is why I have asked some of my favorite bloggers to come "babysit" you while I am busy doing grown up stuff. Okay?

So...In no particular order I will be leaving you in the capable literary hands of:

One of my very best friends, Jenn over at  Life Behind the Uniform. Child development guru and my favorite camping buddy, Angela from Sing, Dance, Play, Learn. And last but not least, you will be hearing from my accountability partner Sumi who is going to share some diet and exercise tips with us.

 In Angela's case, she bravely embraces cooking with the children in her daycare center. As a former nanny, I can tell you this is no small feat. Angela will highlight some of the benefits of cooking with your little ones, complete with a wonderful photo recipe tutorial.

Jenn has had the opportunity to travel all over the United States as a military wife and she loves to sample the local fare just like me! She will be sharing some of her favorite foodie finds, from coast to coast.

Sumi is also a fellow foodie, but she somehow finds a way to keep herself in amazing shape. I've asked her to share some of her favorite healthy recipes and to give us some tips on getting and staying motivated with work out routines. You all know how I feel about exercise, but if she can kick my butt into gear, you know she MUST be good.

So I will leave you now, with that teaser. Visit their sites, get to know them because they will be taking care of you for the month of May. I promise, I leave you in very capable hands. And don't worry, I will be here still...lurking in the background...

;-)


Thursday, November 1, 2012

Bruschetta Madness!

Lately I have been doing a lot of entertaining. Somehow, our my house became our default spot for Thursday girls nights. Not that I mind of course, entertaining is one of my all time favorite things to do. And if I don't have to go out after a long week at work to enjoy the company of my girlfriends than that is alright by me!

A thing we gals like to do is set a theme for our girls night dinners. So far we have done "Kids Night" where indulged in chicken nuggets, tator tots and of course mac and cheese (homemade, obviously!).

"Sushi Night" where we all brought one item needed to make California and veggie rolls, it was so much fun teaching ourselves (and by teaching ourselves I mean my girlfriend Maile teaching US) how to roll the sushi. Recently we did a pizza bar where we all got to assemble our own individual pizzas and baked them to order. It is a lot more fun and interactive than one person cooking in the kitchen away from the group and you should just hear the great gossip we come up with while we cook! 

So this Thursday I was thinking of doing small bites for a change. And I remembered a few years back when my dear friend Jessica was turning twenty....uh...twenty ONE, yeah....and her mother asked me to cater the party at their vineyard in Paso Robles. I made my very favorite small bite... Bruschetta.

Now, I happen to love Bruschetta for many reasons. I love bread. I love finger food. I love topping things with other delicious things and I love the idea of a totally blank canvas. Tiny one bites can be anything you want them to be. Case in point, I saw Giada De Laurentis make this amazing looking cheese tart with blue cheese, pears and prosciutto and I thought...that NEEDS to become an appetizer. I tried them out for Jessica's birthday party and they were a huge hit. They are amazingly simple to put together and full of so much flavor. Sweet, savory and surprisingly bright flavors.

So my favorite one bite has inspired next weeks girls night. Try it out and see if you're inspired. Turn your favorite sandwich into an hors d'ourve, play with flavor profiles and textures too. I've included this "bruschetta" like recipe to get your creative juices flowing!

Tell me what you're putting on toast these days!


Pear Gorgonzola and Prosciutto Bruschetta

Ingredients:

1 large baguette
1 8 oz container of cream cheese, room temp
1/4 c gorgonzola crumbles
1 tsp fresh thyme
1tsp freshly ground black pepper
2 medium sized pears, your favorite variety, quartered and sliced thinly
6 thin slices of prosciutto
local honey ( I used a raspberry honey from our farmers market)

In a small bowl, mix cream cheese, Gorgonzola  thyme and black pepper. Taste. I omit salt because I like the natural saltiness from the cheese, but please correct the seasonings accordingly.  Set this mixture aside at room temp. Meanwhile, in a large pan, saute the sliced pears over high heat until slightly browned around the edges. For a crisp, fresher taste and texture you may skip this step. I happen to love the deep sweetness that comes from a cooked pear.  Cut the baguette into thin slices and toast in the oven, set aside.

Assembly:

Have your cream cheese mixture out and ready along with your cooled pears and the prosciutto (I like to loosely separate the prosciutto ahead of time so I'm not fumbling with it later). Spread a thick layer of your cream cheese onto the toasted baguette, top with the prosciutto and then with the pear slices. Move to your serving platter and drizzle honey over each brushcetta generously.

Enjoy!


Friday, January 13, 2012

Culinary School Adventures

Well I managed to make it through the first semester at the Paso  Robles Culinary Academy!
It has been a very fun, crazy, stressful, challenging experience. And it has definitely validated my desires to work in the Culinary field. I am not 100% positive that a restaurant kitchen is the place for me, all that running around and screaming in a hot kitchen just doesn't sound like fun at all. I may stick to catering and just try to expand that a bit when the program is over.

The gang and I from Culinary, taking a break from class for a Christmas exchange and lunch @ Pappy McGregors in Paso Robles
Baking Finals, 2 tiered nut cake, cheese danishes,  and petit fours.  I chose a pink theme!


Baking Finals. Lemon tartlets, checkerboard cookies, meringue hearts and eclairs.

The beautiful and talented Amber, with her Baking Finals display

"Putting up Plates" Salmon and potatoes Anna with asparagus and a lemon burre blanc, salad and soup to complete the meal. 


Advanced Pastry Finals display. Tiramisu, grown up "pop tarts", carrot cake, apple tartatine, creme brulee and black berry pana cotta.

This semester I've decided I will compete in something called SkillsUsa in the Culinary Arts section. I don't plan on advancing to far my first year, but I think it sounds fun and it will help me with my timing and handling the stress of cooking on the line. 

Wish me luck!

Friday, November 11, 2011

Spinach and Pumpkin Lasagna

Yesterday was Thursday, my busiest day of the week. I am in school for over six hours and I still have to get all my studying and cooking and cleaning done somewhere in between all my classes.

So on Thursdays, when it comes to dinner, I am looking for something easy peasy. Something I can throw together and leave in the oven for Mike, and since I wont be eating dinner until after 830, I'd like it to be healthy. Clicking through some fall themed oven meals yesterday morning I found a recipe for Spinach and Pumpkin Lasagna, mmmm. And since I still had half a can of pumpkin puree (from baking some delicious pumpkin cheesecake) I figured why not.


I haven't had this combination before but boy am I ever a fan now! There is a natural richness provided by the pumpkin puree and a subtle earthiness from the spinach and a dash of nutmeg. The recipes I found online mostly included gobs and gobs of cheese which I am normally a fan of, just not today. I opted to leave out a giant layer of cheese in exchange for a lighter bechamel made from skim milk and a 1/2 cup of shredded Parmesan that goes into our sauce and on top of the lasagna.

If you have never made a white sauce before here are a few tips:

* Use a heavy bottomed pot, something that will evenly distribute heat
* Add your milk a little at a time at first, paying special care to whipping out lumps
* Your sauce must come to a boil before you're done, this is the only way to tell how thick the end result will be
*Don't season your sauce until after the cheese has been added. Parmesan is salty as is and you don't want to over do it!

We served this lasagna with roasted vegetables and a VERY tall glass of milk. What? Don't look at me like that, milk is good and good for you!

We had carrot cake that I made in my Baking Science class for dessert. It was phenomenal, and I can say that because it was someone else's recipe and it was my first time making it so I am thrilled it came out well.

This lasagna came together so fast! And it doesn't take a ton of ingredients like the ones we found online. You can put it together and leave in the fridge until it's time to eat. It is healthy, rich, delicious and vegetarian! What's not to love??

Spinach and Pumpkin Lasagna

1/4 cup butter
1/4 cup flour
2 cups skim milk (you may replace 1 cup of milk with low fat, sodium free broth)
pinch of nutmeg
1 clove of garlic
1 bay leaf
3-4 peppercorns

1 cup wilted spinach, drained well
1 cup pumpkin puree (or half of a 15 oz can)
1 egg yolk (optional)
1/2 cup shredded parmesan
1/2 box lasagna noodles, cooked according to directions


To make the bechamel, on low heat melt butter in a large heavy sided pot. Sprinkle in flour and cook until the mixture has taken on a little color. Switch heat to medium and add the milk a small amount at a time constantly stirring. If you notice any lumps, lower the heat and whisk until they are out.

Add garlic, bay leaf, a few peppercorns and nutmeg.


Once all the milk has been added bring mixture to a slow boil, continuing to whisk out any lumps. Once at a boil, examine mixture for thickness. It should lightly coat the back of a spoon, if it is thick or paste like, add more milk or broth. Let it simmer on low heat, mixing with a spoon occasionally. Remove garlic and bay leaf.

Remove from heat and add 1/4 cup of the parmesan cheese, mixing furiously! Taste, then season accordingly. Set aside, stirring frequently to prevent a skin forming on the top of your sauce.
*Note: this sauce is THE balls...remember this sauce. You will use it often, I promise!

For the pumpkin layer, add puree, the remaining parmesan cheese and egg yolk to a small bowl and mix until combined. Season with a little salt and pepper, you can add Italian seasoning if you'd like but only a small pinch. Set aside.


Now we start assembling. This is how I put the lasagna together, use it as a guideline or be a rebel and mix it up. I can guarantee you no one will ever know. It's not as if someone is going to cut into their lasagna and say..."Is that a layer of spinach, THEN a layer of pumpkin? UNACCEPTABLE!" Not going to happen....I promise.

So here's how it went down:

Have your cooked lasagna sheets, pumpkin mixture, bechamel and wilted spinach all close by. Grease your favorite baking dish, I used a 9x9 I think, and put down a spoonful of bechamel. Onto the bechamel you'll layer a few sheets of lasagna noodles. If you find your lasagna sheets too long or short, do not fret. Simply cut some sheets into long or short strips to fit or fill in the gaps, it isn't an exact science...your finished product will look stunning anyway.


After the first layer is down spread all of the pumpkin mixture and top with more lasagna sheets. Put bechamel on the second layer, just thick enough that we will see it when we cut into the lasagna. You can add shredded mozzarella if you absolutely cannot do without that super cheesy layer. I didn't miss it, honestly but my gut says that some of you will NEED this layer...so go for it. This gets another layer of pasta then you sprinkle the wilted spinach all around, top with a little bechamel and lasagna sheets. Now spread the very last of the sauce onto the top of your lasagna, shred some extra Parmesan all over the top and you're done. Throw that sucker in an oven set to 350 and cook until the edges are slightly browned and your sauce is bubbling.

You're not going to want to (because your house will smell SO amazing) but you MUST let this rest. The different layers need time to chill out and relax a little before you dig in. If you are a good little boy or girl and wait 10 minutes, when you cut in the layers of orange and white and green will be perfectly distinct and stunning when you go to plate.

I hope you all are enjoying the holiday season so far. There has been a lot of snuggling and hot cocoa going on around here, not looking forward to finals week next week but here's hoping they fly by for all of us! Cheers!


Wednesday, November 9, 2011

Slow Cooker BBQ Beef Dinner

I love summer. I do, it's just that....well summer is hot and balmy here in Paso Robles. It get's well into the triple digits and you're not getting ME into a bathing suit so I just sweat and complain for three whole months. I don't like the heat. It's not for me at all. You know what IS for me though? The foods of summer. BBQ in particular is my very favorite thing to eat during the summer. And ice cream sundaes!

I know there are no rules saying I can't have bbq during the winter months, but it's just less convenient. I mean who's going to fire up that grill when it's 38 degrees outside and hailing? Not I....Not I.

Me, Diana and her daughter Kimberly
So here I am, it's November. It is freezing out, but my stomach doesn't know that. My stomach wants bbq...and an ice cream sundae. We have some friends in town visiting us from SoCal and I wanted to treat them to a nice home cooked meal after a day of site seeing. We got to show them around the down town area all day and then my stomach started growling...oh did it ever...

Hanging downtown, working up our appetites
I am a slave to that stomach. Look at these love handles. These love handles, clearly, are not told NO often. So, instead of firing up a grill I plugged in my slow cooker and came up with this delicious and accidentally frugal meal that has all the flavors of summer, with a few twists to suit the colder months. Instead of my go to pulled pork, I mixed it up a little and used beef. I also added a spicy element, chipotle pepper, to keep us nice and warmed through. The entire bbq beef dinner cost us under $10 for four servings.

The recipe's here are just as easy as it gets. Minimal ingredients and minimal effort. You throw the beef in a slow cooker for 4 hours, you make and refrigerate the coleslaw (optional) and the dessert is so incredibly easy it's dangerous.

Let's talk about dessert for a second...what do you think of when you think of fall? Apples! Yes, and apple pie should come right to mind if you are at all a normal red blooded American (Ah-Murica Hell YAH). I didn't feel up to making a whole apple pie, but I did yearn desperately for that warm apple pie a la mode flavor. I think I found the next best thing. It is faster than making apple pie but just as delicious, possibly...maybe....perhaps even.....better?

You may place your wonderfully tender bbqed beef atop a sesame seed bun as we did, but be prepared it is a messy messy feast. We rounded out the meal with our favorite eh-hem....canned chili beans and cherry coke. I suggest you do the same because I said so and because it is delicious and because I me and my love handles clearly know what we are talking about here!


Slow Cooker BBQ Beef

1 pound stew beef or fajita beef (whatever is on sale)
1 c BBQ Sauce
1/4 c water
1 tbsp chipotle peppers
S&P

Mix all the ingredients in your slow cooker, set to high for 1 hour and then to low for about 2 more hours or until the beef flakes easily with a fork.

Quick Cole Slaw

(make ahead)
1/2 head of cabbage, shredded
1 carrot, grated
1/2 cup of mayo (or so, I fake measured it)
2 tbsp agave nectar or 1tbsp sugar
1 tbsp bbq sauce
1 tbsp apple cider vinegar

s&P

Mix well in large bowl. Fridge...NOW.


Caramel Apple Pie Syrup (To serve over ice cream)

1 apple, peeled and chopped
1/4 cup butter
1/4 cup brown sugar
2 tsp vanilla extract
1/2 tsp cinnamon
1tbsp french vanilla/caramel coffee creamer

In a small sauce pan add butter and sugar. Heat over a low flame until they are melted together. Add apples, vanilla, cinnamon and raise heat to medium. The sugar mixture will bubble slightly if it looks like it will boil over, lower the heat. Let it simmer like this for about 1-2 minutes or until the apples are fork tender. Remove from heat and stir in the creamer. Serve over a big scoop of your favorite vanilla ice cream -OR- you can do what my husband did and spoon it over some left over pumpkin pie!

Friday, November 27, 2009

F-TGIF & A Lazy BBQ Pizza Recipe

My name is Ed and I hate Fridays. Fridays are fun when you are the center of some close knit social circle. Maybe you have a group of friends who all stay in touch via the newest of social networking sites, and you all get together on the weekends and get "sloshed" or "hammered" or "arrested". But I don't have that here.


My name is Ed and I have dogs. And on Fridays we do nothing. Nothing at all. My dogs and I eat breakfast and we watch reruns of Law and Order SVU on TIVO. We watch the sun rise and set from the L shaped couch facing the leaf littered backyard. We do not move from this spot. Our phone does not ring and even if it does we are too smelly and depressed to go out into the world. So we make up excuses about laundry that needs to be done or how we are trying out a new recipe. We are so pathetic on Fridays that we can hardly believe ourselves.

My name is Ed and you can remove WE from the last paragraph. Because in that context the word WE is very misleading. Those dogs do not watch TV. So it's really just me. Me here
making excuses and forgetting to shower until five pm each and every Friday. Without fail. It is not fair to bring my dogs into this. Because truth be told. They would like a walk. Today has been an especially lazy Friday and I am ok with that because sometimes lazy days are ok. Lazy dinners can be ok too, if you utilize your leftovers correctly. I peaked into our fridge today and started to panic.

Will I actually have to go OUT? Into the world and buy stuff to make dinner? Fret not, I said to myself. I took out some left over pulled pork from 2 nights ago and whipped up....Pizza.

Uh, yes. PIZZA. Cheesy and gooey and fantastic. Magic, really. Who does not like pizza? I met ONE person in my whole life who didn't like pizza and it was because she was allergic to nearly everything you'd ever want to put on a pizza. I felt bad for her. I cried a little...it was awkward.

Anyhow, be inspired by my lazy dinner. If you're grumpy and lonely on a Friday night at least know that you can pull together a decent meal.

So... Have you heard of BBQ Pizza? Do you find it delicious? Me too. And that's why I found this "random act of pizza" so phenomenal. First that I had everything on hand to put it together and secondly because it actually tasted amazing. The balance of sweet and savory with the smokey flavors of the pulled pork and bbq sauce...OH and the cheese...so much delicious melted cheese. This is a recipe you will want to make after a big bbq when you have lot's of leftover pork or even chicken. I was feeling especially lazy tonight and happened to have whole wheat pizza dough on hand, if you don't go here for a quickie pizza dough that won't make you break a sweat.


Lazy BBQ Pizza

1 cup (more or less) of leftover bbq pork/chicken or even beef
1 cup of your favorite bbq sauce
3/4 to 1 cups shredded cheese, mozarella and Parmesan or "mexican style"
2-3 scallions
1 bunch of cilantro
1/4 of an onion sliced
prepared pizza dough

Preheat your oven to 400 degree's. Lightly oil a medium size pizza pan or use the flat, underside of a cookie sheet.
Roll out your pizza dough till it just fits inside your pan (depending on what brand/recipe you're using the target size is about 10-12 inches). Sh-mear your dough with the bbq sauce.

Add your shredded cheese, I like to spread it pretty thick all the way to the crusts.
Next you'll add the leftover pulled pork and onion slices.
Place in the oven and bake for about 15 minutes before checking the bottom by gently lifting at the edges of the pizza with a long spatula.

You're looking for a light brown crust that is dry, not drooping or doughy. Continue cooking for an additional 10-15 minutes checking often. When the pizza is done the crust will be browned nicely, cheese bubbling and melted and the pork will be warmed through. Right out of the oven, add the cilantro and scallions. Serve piping hot with a mixed green salad or...if you're having THAT kind of Friday...A Budlight.


This is the kind of lazy meal that you will remember. And if it's any consolation, you will feel WAY less lazy making this pizza rather than ordering one. AND you will have avoided that nosy pizza boy judging you (in your pajamas with your Budlight in one hand). I hope you enjoy this recipe, it is late and my eyes are drooping the dogs are already asleep and we have ran out of Law and Order episodes, so I bid you adieu!